Your Facebook Is Incomplete Without This
So you’ve ventured into the land of Facebook Ads to create awareness and viral growth for your acupuncture practice, that’s great, you’re now taking your future into your own hands and being proactive about your marketing.
Many of these Ad systems (Google Adwords and Facebook Ads), if you don’t know how to use them, can quickly become a money pit. The trick is to take things slowly and to always be testing. And this is where the Facebook Conversion Pixel comes into play.
The Facebook Conversion Pixel is there to help you save money! How does it do that? The Facebook Conversion Pixel tells Facebook how a new patient, coming from your Facebook Ad or post, is interacting with your website. And this tells Facebook and you, how well your ad is working.
For example, let’s say you create a Facebook Ad to encourage people to book an acupuncture appointment with your clinic. The Ad drives the new patient to your website’s booking page. The patient completes the appointment booking and embedded in the confirmation page (i.e. the Thank You page) is the Facebook Conversion Pixel.
When the new patient reaches the booking confirmation page, with the Facebook Conversion Pixel, this is called a conversion. Meaning, you’ve converted a potential patient to an actual patient. The Facebook Conversion Pixel will then send data back to Facebook telling them and you this conversion happened. Why is this important?
This gives you concrete data that your Facebook Ads are working and you’re actually making real money. Repeat after me, Facebook “Likes” does not equal money!
So how do we create a Facebook Conversion Pixel?
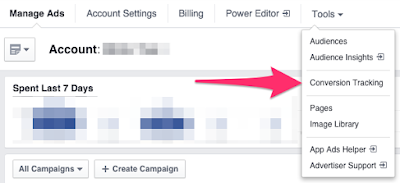
Click Conversion Tracking
Click Create Pixel
Create Pixel
Click View Pixel Code
View Pixel Code
Copy and paste the Pixel Code into your booking confirmation page.
The code is pure JavaScript, so you can add it to most website platforms.
Congratulations, you’ve just added your first Facebook Conversion Pixel!
Now, when creating Facebook Ads, you’ll be able to choose this newly create Facebook Conversion Pixel.
Questions? Let me know in the comments below. I’d love to hear how this blog post helped you.
Minto Tsai
Founder
P.S. If this helped you, please Like, Share, email… all the social network love you can give!


